| lots of cool stuff | |||||
| JUST FOR THE FUN OF IT | |||||
| About Us | Contact Us | ||||
|


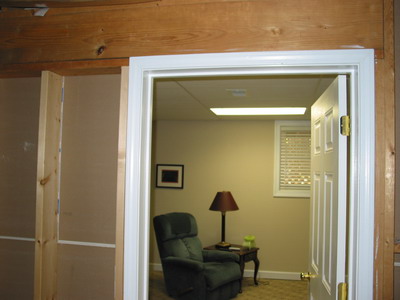
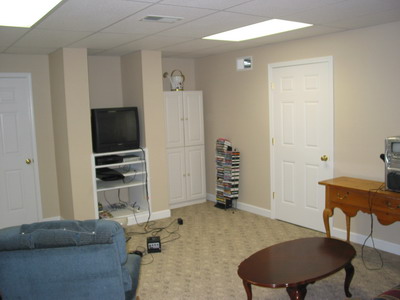
How to Hang a Dropped Ceiling.Object: This is a short “how to” article on installing a dropped ceiling by doing it yourself to save on installation costs.I installed a dropped ceiling in my daughter’s basement in Atlanta. These are the steps that I took to accomplish that. The first thing was to establish the height of the ceiling. It had to be below all the sewer pipes and air conditioning ducts, etc., so that none of those things showed. Her total space was 9’, leaving us a tight space to work in. It would have been much easier with a 10’ space, but that is not what I had. To determine the low point, I used a laser level, which mounts on a pole that is adjustable in length. This is a gadget that I bought at Lowe’s. It comes with a sectional pole that has to be screwed together and has a foot for the floor and a screw type adjustment for adjusting for height at the top. The laser itself sits on a small platform, which is designed to slide up and down the pole to any position you want it. It will fire lasers either vertically, horizontally or both ways at once.
I placed the laser pole in the center of the room where it could “see” all points of the room. I then raised it to the point that the laser beam intersected with the lowest object hanging down from the ceiling (typically an air conditioning duct). I then measured down from the laser mark on the wall to the floor. That would be the height of the new dropped ceiling. Actually there is no point in measuring unless you just want to know the height. You can leave the laser on and in place while you install the ceiling. It gives you a mark to work to and insures that the ceiling remains level. If a laser level is not available, spirit level with a chalk line will work also. The laser level is much cleaner, neater, and more precise. After carefully measuring the perimeter of the room to get the total length of outside walls, write this number down for later purchase. Then, divide the wall length by 24” to get the number of rows of tiles you will have. This will tell you the number of pieces of channel you must buy to support the tiles. You will need a strip or row of channel every 24” to support the tiles. Multiply the number of rows times the length of the rows (length of the room) to get the total number of feet of channel to purchase. Write that down. Now you will need to determine the number of cross-connecting pieces of channel to buy. That will be determined by whether you purchase 2x2’ or 2x4’ tiles. You will need twice as many cross pieces if you elect to go with 2x2’ tiles. A store representative at Lowe’s will help you determine what you need to purchase. You will also need to buy “hangers” to support the grid from the above floor or ceiling joists. If you really want to save money, you can use wire coat hangers just as easily.
Begin the process by nailing the outside support pieces to the wall (they are in the shape of an “L”). It will be necessary to find the wood behind the sheetrock and nail into that and not just the sheetrock. Sheetrock alone will not support the dropped ceiling. Use the laser beam to align the pieces so that they are level. Do the entire outside walls before starting with the inside pieces. After finishing the outside pieces, it is time to start the inside channel installation. The inside pieces rest on top of the wall pieces every 24”. I believe the pieces are 8 or 10’ long, but I am not sure now (it’s been a year since I did this). Place one end of a piece on the supporting wall piece and hang the other end from the ceiling joists with a wire hanger. You simply drive a nail into the supporting wooden joists above and twist the wire around it. The other end of the wire is inserted through a hole in the grid piece. Use the laser beam to determine that you have the piece level and tie the wire to the grid piece. Now go back and install a wire about once every 4’, starting with the end next to the wall. Now connect a new piece of grid to the one you have already installed. They are made to clip into each other. Work your way across the room by fastening these pieces together and hanging them from the joists until you reach the other side of the room. It will probably be necessary to cut off the last piece so that it will lie on top of the wall piece on the opposite wall – a piece that you had previously attached to the wall. Install one of these rows of grid every 24” until you reach the other side of the room. Now you must connect them with 24” pieces of connector grid. These pieces of grid are designed to fasten into the longer pieces. They will hold the longer grid pieces exactly 24” apart and be just perfect for fitting in the tiles. If pre-measuring determines that the room does not divide exactly into even 24” spaces, and you are going to end up with a left over run of tiles that is less than 24”, you may want to divide the odd width by 2 and make your starting and ending rows the same width, which will be something less than 24”. For example, if the odd sized space left over after a run of 24” spaces turns out to be 16”, then simply start out with an 8” run and finish with an 8” run. All the rows in between the first and last row will be 24”. It will be more aesthetically, appealing that way.
If you have placed your wires exactly vertical and only at 24 or 48” intervals and you have used the laser to insure that the grid work is exactly level, it is now time to drop the tiles into place. If you determine that the grid work is not exactly level (by using the laser), now is the time to adjust the grid using the wires to either raise or lower the grid work until it is level. Lights can also be purchased which is exactly the same size as the tiles, so that they just drop in place, too. Of course, you will need to have already provided the wiring and switching for the lights ahead of time. You may also need to position air-conditioning ducts and returns above the ceiling so that you can cut holes in a ceiling tile to install these items. I had to do that also. We purchased flex duct from Lowe’s and cut into existing ducts and ran these extra ducts to ceiling grills and registers so that the room would have the proper air conditioning.
|